Converting My Casio F-91W to a Sensor Watch
Before I begin, think if you can name a wristwatch that's famous enough to have it's own wikipedia article and was worn by a previous US President. Oh, and also it only costs around $15.
Yes, I already spoiled it with the post title, but that watch no Rolex or Omega: it is the iconic Casio F-91W. Released in 1989, it's a very bare bones watch that has stood the test of time and is still in production today. It has become a ubiquitous and popular watch thanks to its simple-yet-tasteful design and reliable timekeeping.
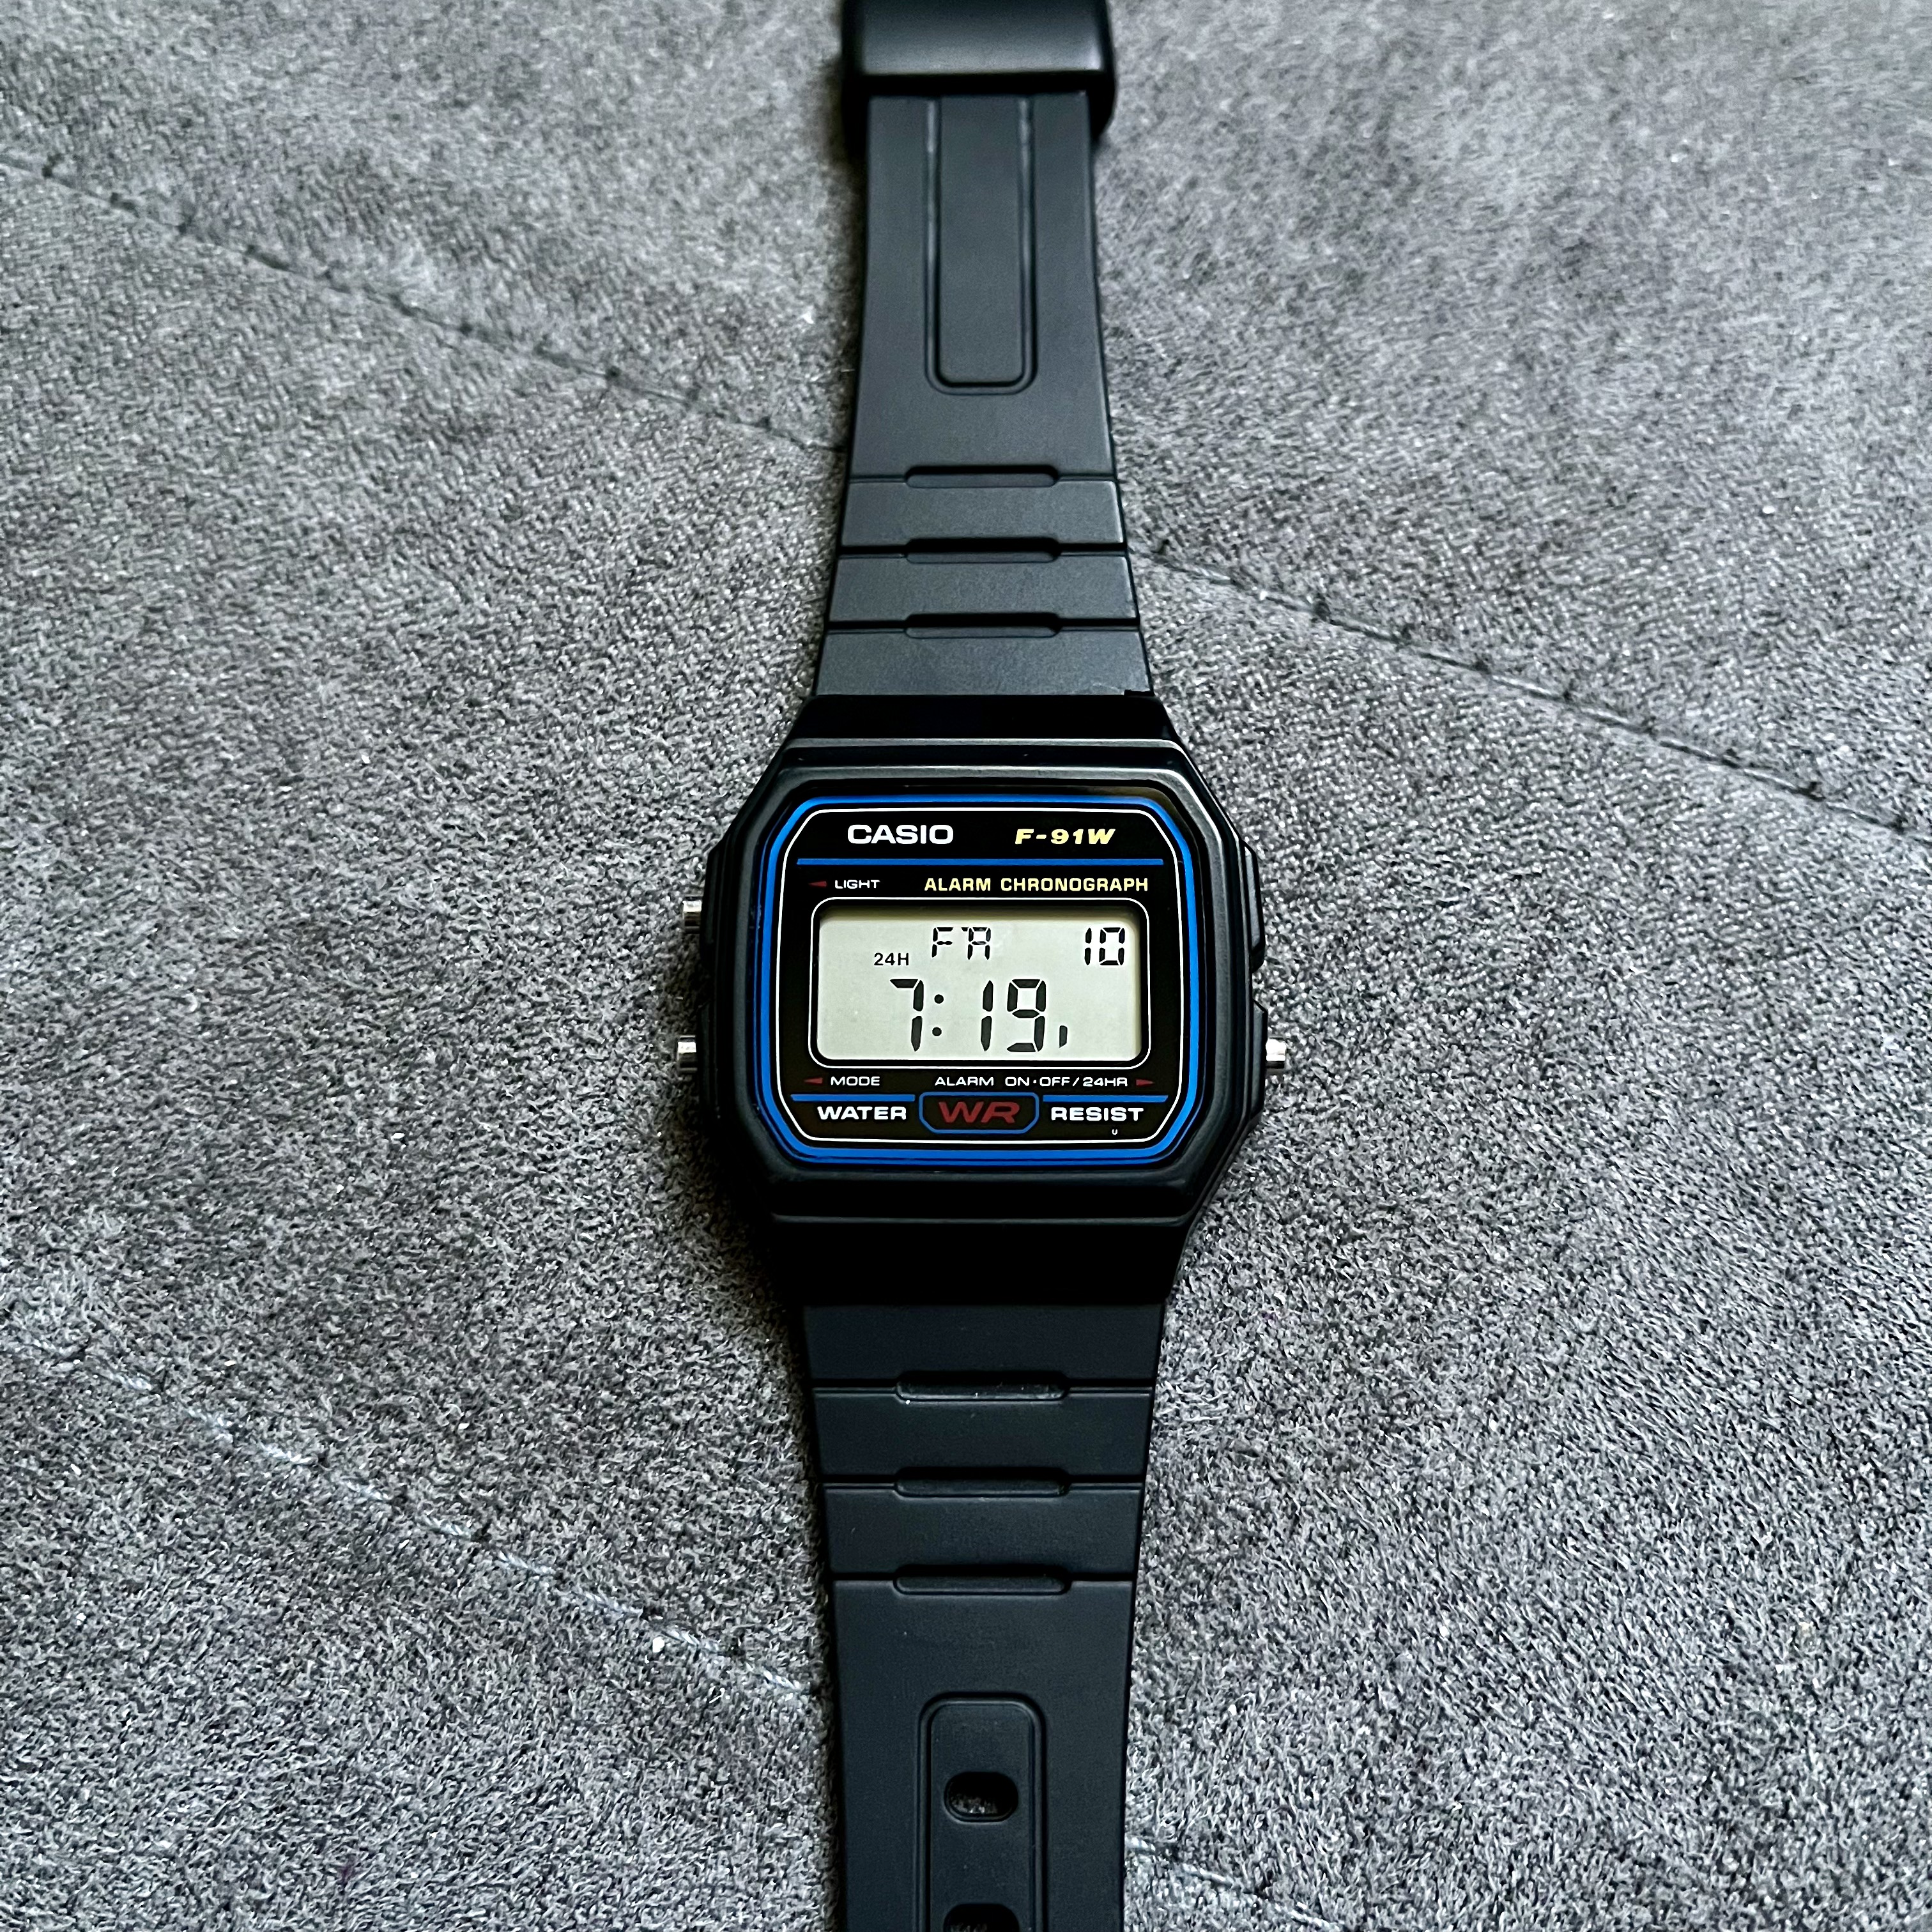
If you can't already tell, I'm a big fan of this watch 😄 I got my first F-91W as a gift about 4 years ago, but even before that I noticed a trend amongst people that I met—people with a Casio F-91W were cool people. I mean that's a bit of a generalization, but it seems that everyone that I've gotten to know with this watch over the years has been someone I've respected.
A Wild Sensor Watch Appears
Imagine my elation in 2021 when I discovered Joey Castillo on Twitter working on a project to upgrade the F-91W with a programmable circuit board with support for swappable sensor modules. It became evident very quickly that this was something I needed in my life.
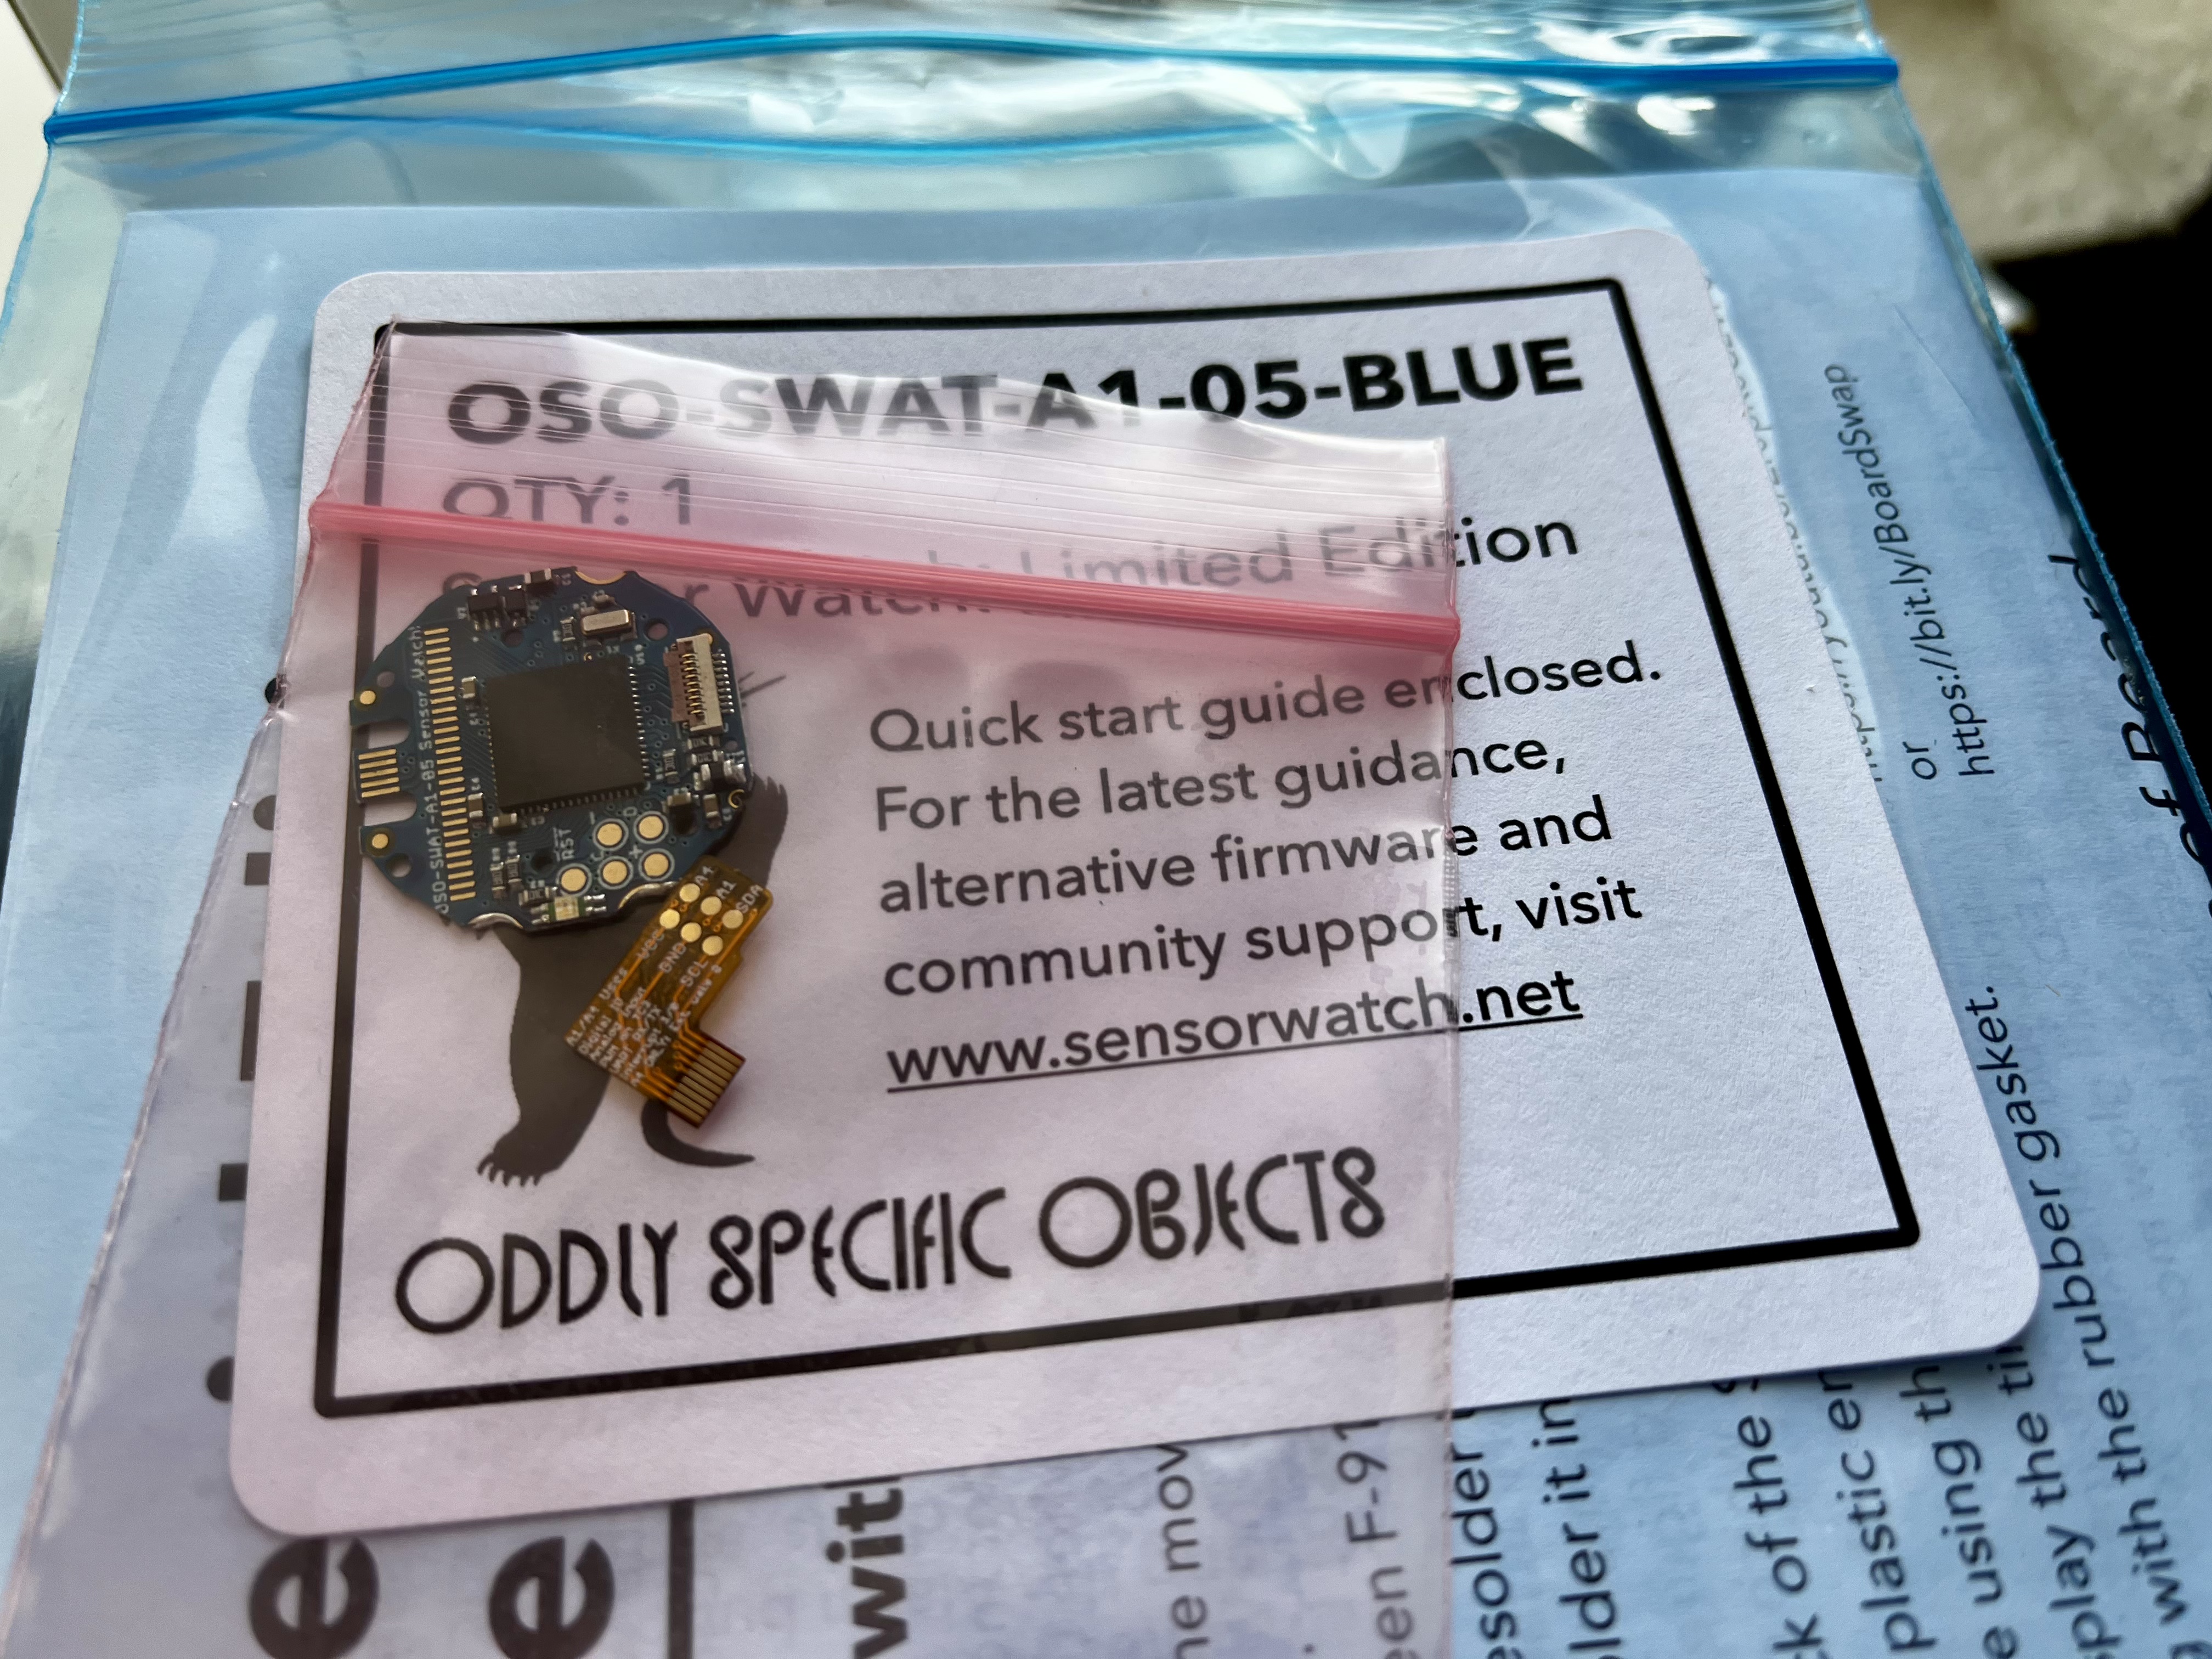
Joey started a Crowd Supply campaign to sell the boards and I backed it immediately, netting me a shiny blue limited edition Sensor Watch board with a temperature sensor module!
Here's some interesting capabilities the Sensor Watch has that you don't get on a standard F-91W:
- See the time in multiple time zones
- Sunset/sunrise time based off your latitude and longitude
- Tell the temperature (with the temperature sensor module)
- Determine the current moon phase
- Read the coin cell battery voltage
- Power the LED on-demand with two different colors
And that's just some of what's already available. Thanks to Movement, the well-documented API for developing new watch faces, it's very straightforward to write your own custom functionality if you're not afraid to write a little C.
Since it's powered off the same coin cell the normal watch uses, it doesn't have bluetooth or wi-fi in order to conserve energy. But there is still plenty of potential even with this restriction.
Heads I Win, Tails You Lose
When I started thinking of what kind of watch face I could write for my Sensor Watch, my mind immediately jumped to building a dice-rolling application. I really thought it would be handy to be able to flip a coin or roll any of the common dice types on demand. Sure, you can probably do this on your phone but building my own app for this is way cooler. I also play Dungeons & Dragons once in awhile and even though I have physical dice, being able to do dice rolls on my wrist is a fun idea.
Like many of my projects, I began with a Product Requirements document:
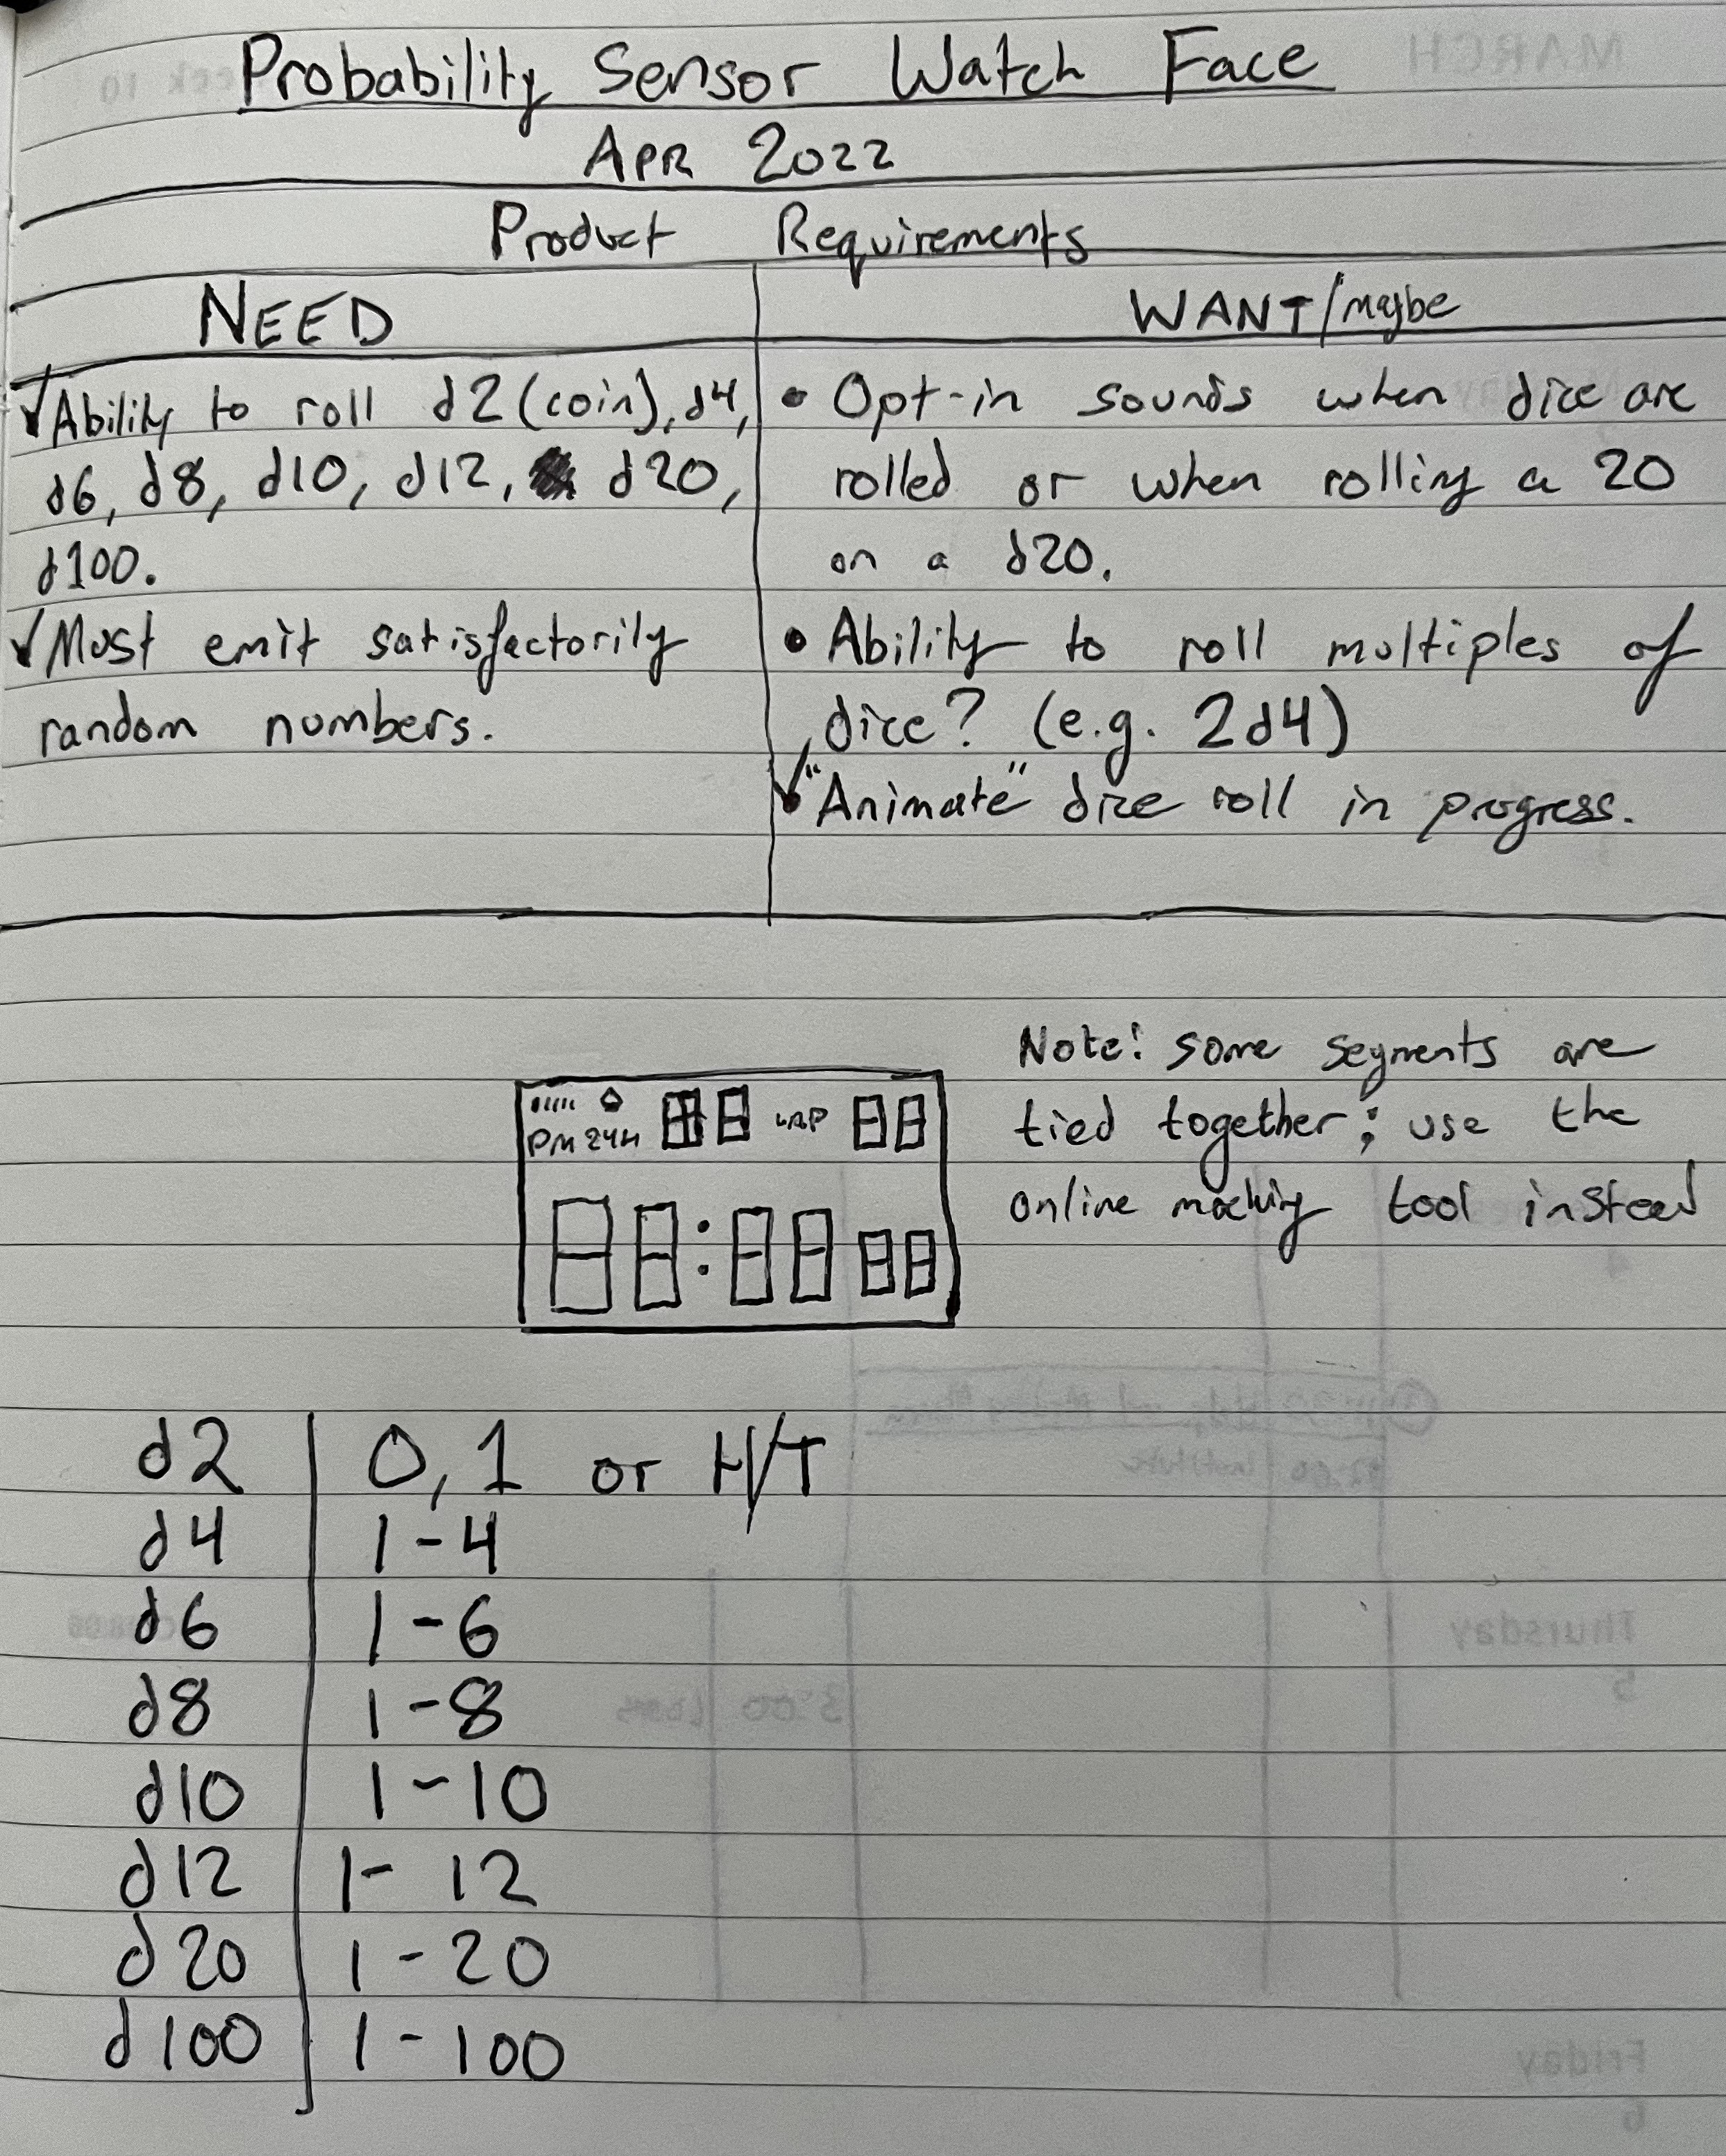
Here you can see the main requirements:
- Flip a coin
- Be able to roll a d4, d6, d8, d10, d12, d20, and d100
- Numbers must be random enough to be usable
As you can see, there were a couple "maybe" ideas that I ended up skipping for my initial creation. I thought it would be fun to optionally play a jingle when you roll a 20 on a d20 for instance. I also had the idea of being able to roll multiples of dice if desired. However, I exclusively use my watch in silent mode and didn't think I'd use the multiple dice roll functionality that much, so I opted to skip those ideas for my first iteration.
Design
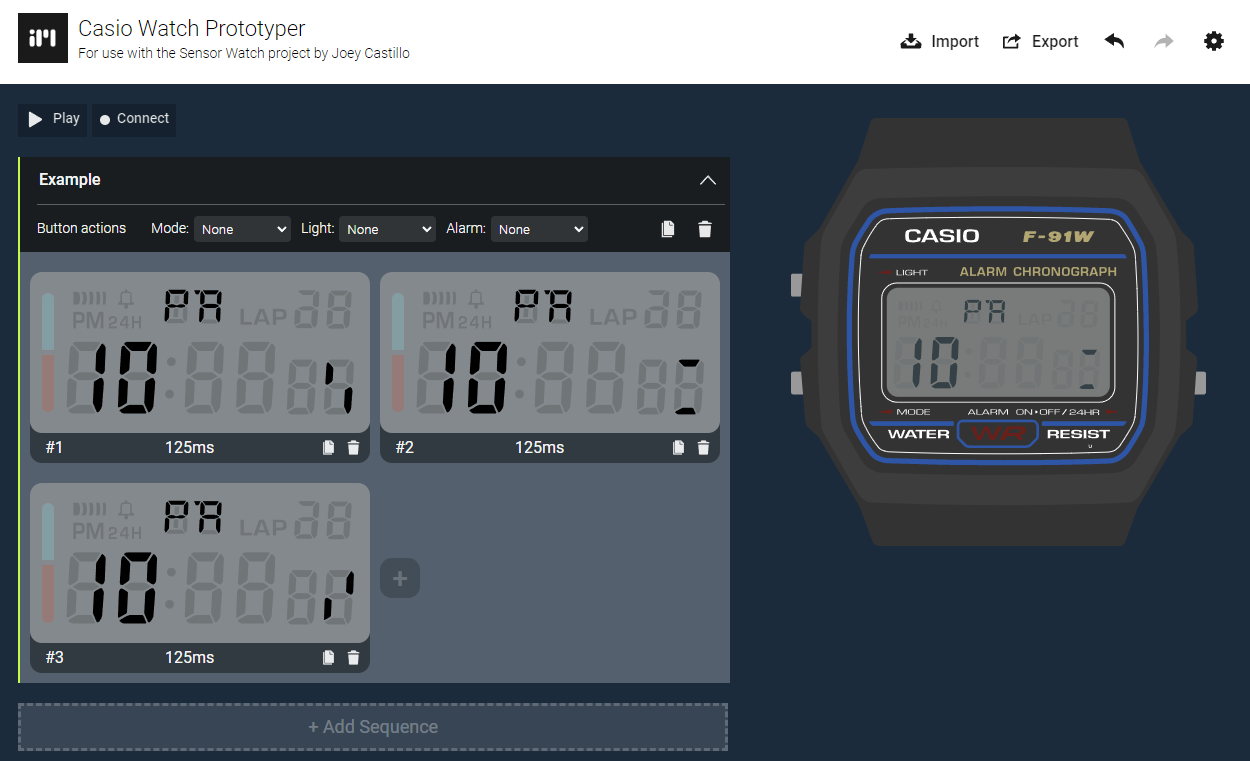
One tool that was really helpful when planning out the interface was the Casio Watch Prototyper. Something I didn't realize at the beginning was that certain LCD segments are tied together when activated. For instance, on the left-most digit, the top and bottom part of the "8" shape cannot be turned on independently. Using the prototyper made it easier to run into these cases earlier and plan out where all the numbers could go. Initially I was thinking the active dice type could go in the top right, but due to the LCD limitations I ended up having to put them on the left.
Another challenge the Prototyper helped solve was creating a "dice roll" animation. I didn't originally plan on having an animation, but during development I realized there were cases where it could be hard to tell if a dice roll was occuring or not. For instance, say I do a coin flip and get heads (displaying H). Then I roll again and get heads again. Well if it still says H, did I actually roll again or did I just fail to press the button all the way down? It quickly became clear that some kind of "rolling" indicator was necessary.
The prototyper made it trivial to try out different kinds of animations and see what it would look like:
Emulator
Once I figured out roughly what I wanted everything to look like, I began writing code. Luckily a contributor created an emulator for the watch hardware so writing software for the board is a lot easier than repeatedly uploading firmware to the sensor watch board. My test-debug loop simply involved making changes, rebuilding, and reloading a webpage (which I'm already used to doing at work all day 😁).
At the time I posted a quick demo on twitter, but since the emulator is web-based I can do you one better! Here is an interactive demo so you can try out the probablity watch face for yourself! The LIGHT button changes which die you are rolling, and the ALARM button triggers a dice roll. Try it out:
Uniform Random Numbers
To generate random numbers on my wrist, I first used C's rand() function like this:
// Seed the random number generator (one time only)
srand(time(NULL));

// Generate a random number and set it on watch state
state->rolled_value = rand() % state->dice_sides + 1;
This worked pretty well, but according to many people on Stack Overflow, this can cause issues with the uniformity of the resulting numbers. In other words, not all numbers on the dice face were equally likely. To address this I followed this example.
However, I wanted to see for myself if the uniformity was being thrown off so I generated 1000 random numbers a couple times using each method and threw them into Google Sheets so I could have some fancy graphs:
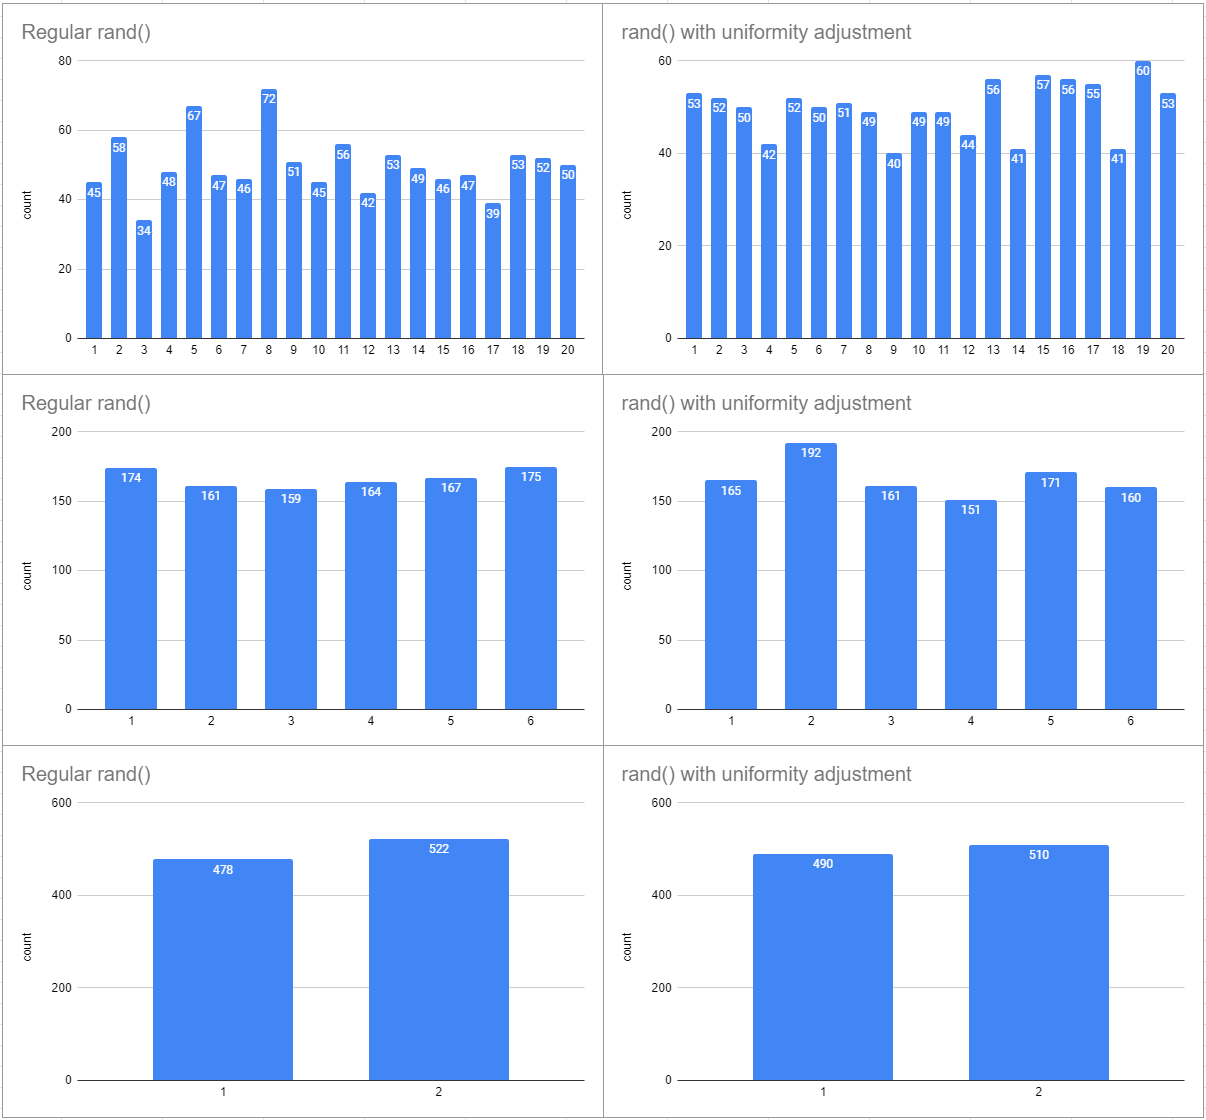
My sample size (1000) was probably small for this experiment, but ultimately it showed me that at least every number was being hit with relatively equal regularity. It also seemed that the uniformity adjustments did slightly improve the results, but truthfully with the numbers being random I came across instances (such as the d6 dice rolls above) where the uniformity looked slightly worse. I think that's just part of the nature of working with random numbers though!
There's Gotta Be A Better Way!
Honestly, I wasn't unpleased with the results using rand(). However, after opening my first PR, Joey pointed me to an arc4random function available on the watch that pulls entropy from the hardware random number generator on the SAM L22 processor used by the watch. This produces 👌 high quality 👌 random numbers for my watch face to easily use.
As an added benefit, there was even an arc4random_uniform function which solved both the uniformity and randomness problems in one fell swoop:
state->rolled_value = arc4random_uniform(state->dice_sides) + 1;
Much cleaner! I don't have any fancy uniformity graphs for my arc4random experiments because I didn't want to figure out how to generate a bunch of random numbers on the hardware and export them to my computer. However, I trust this method produces much better numbers and so far it seems to work well.
If you would like to read the full code for the probability watch face, you can view it on GitHub here!
Putting It All Together
Software complete, it was time to actually install the new circuit board! The first step was disassembly:
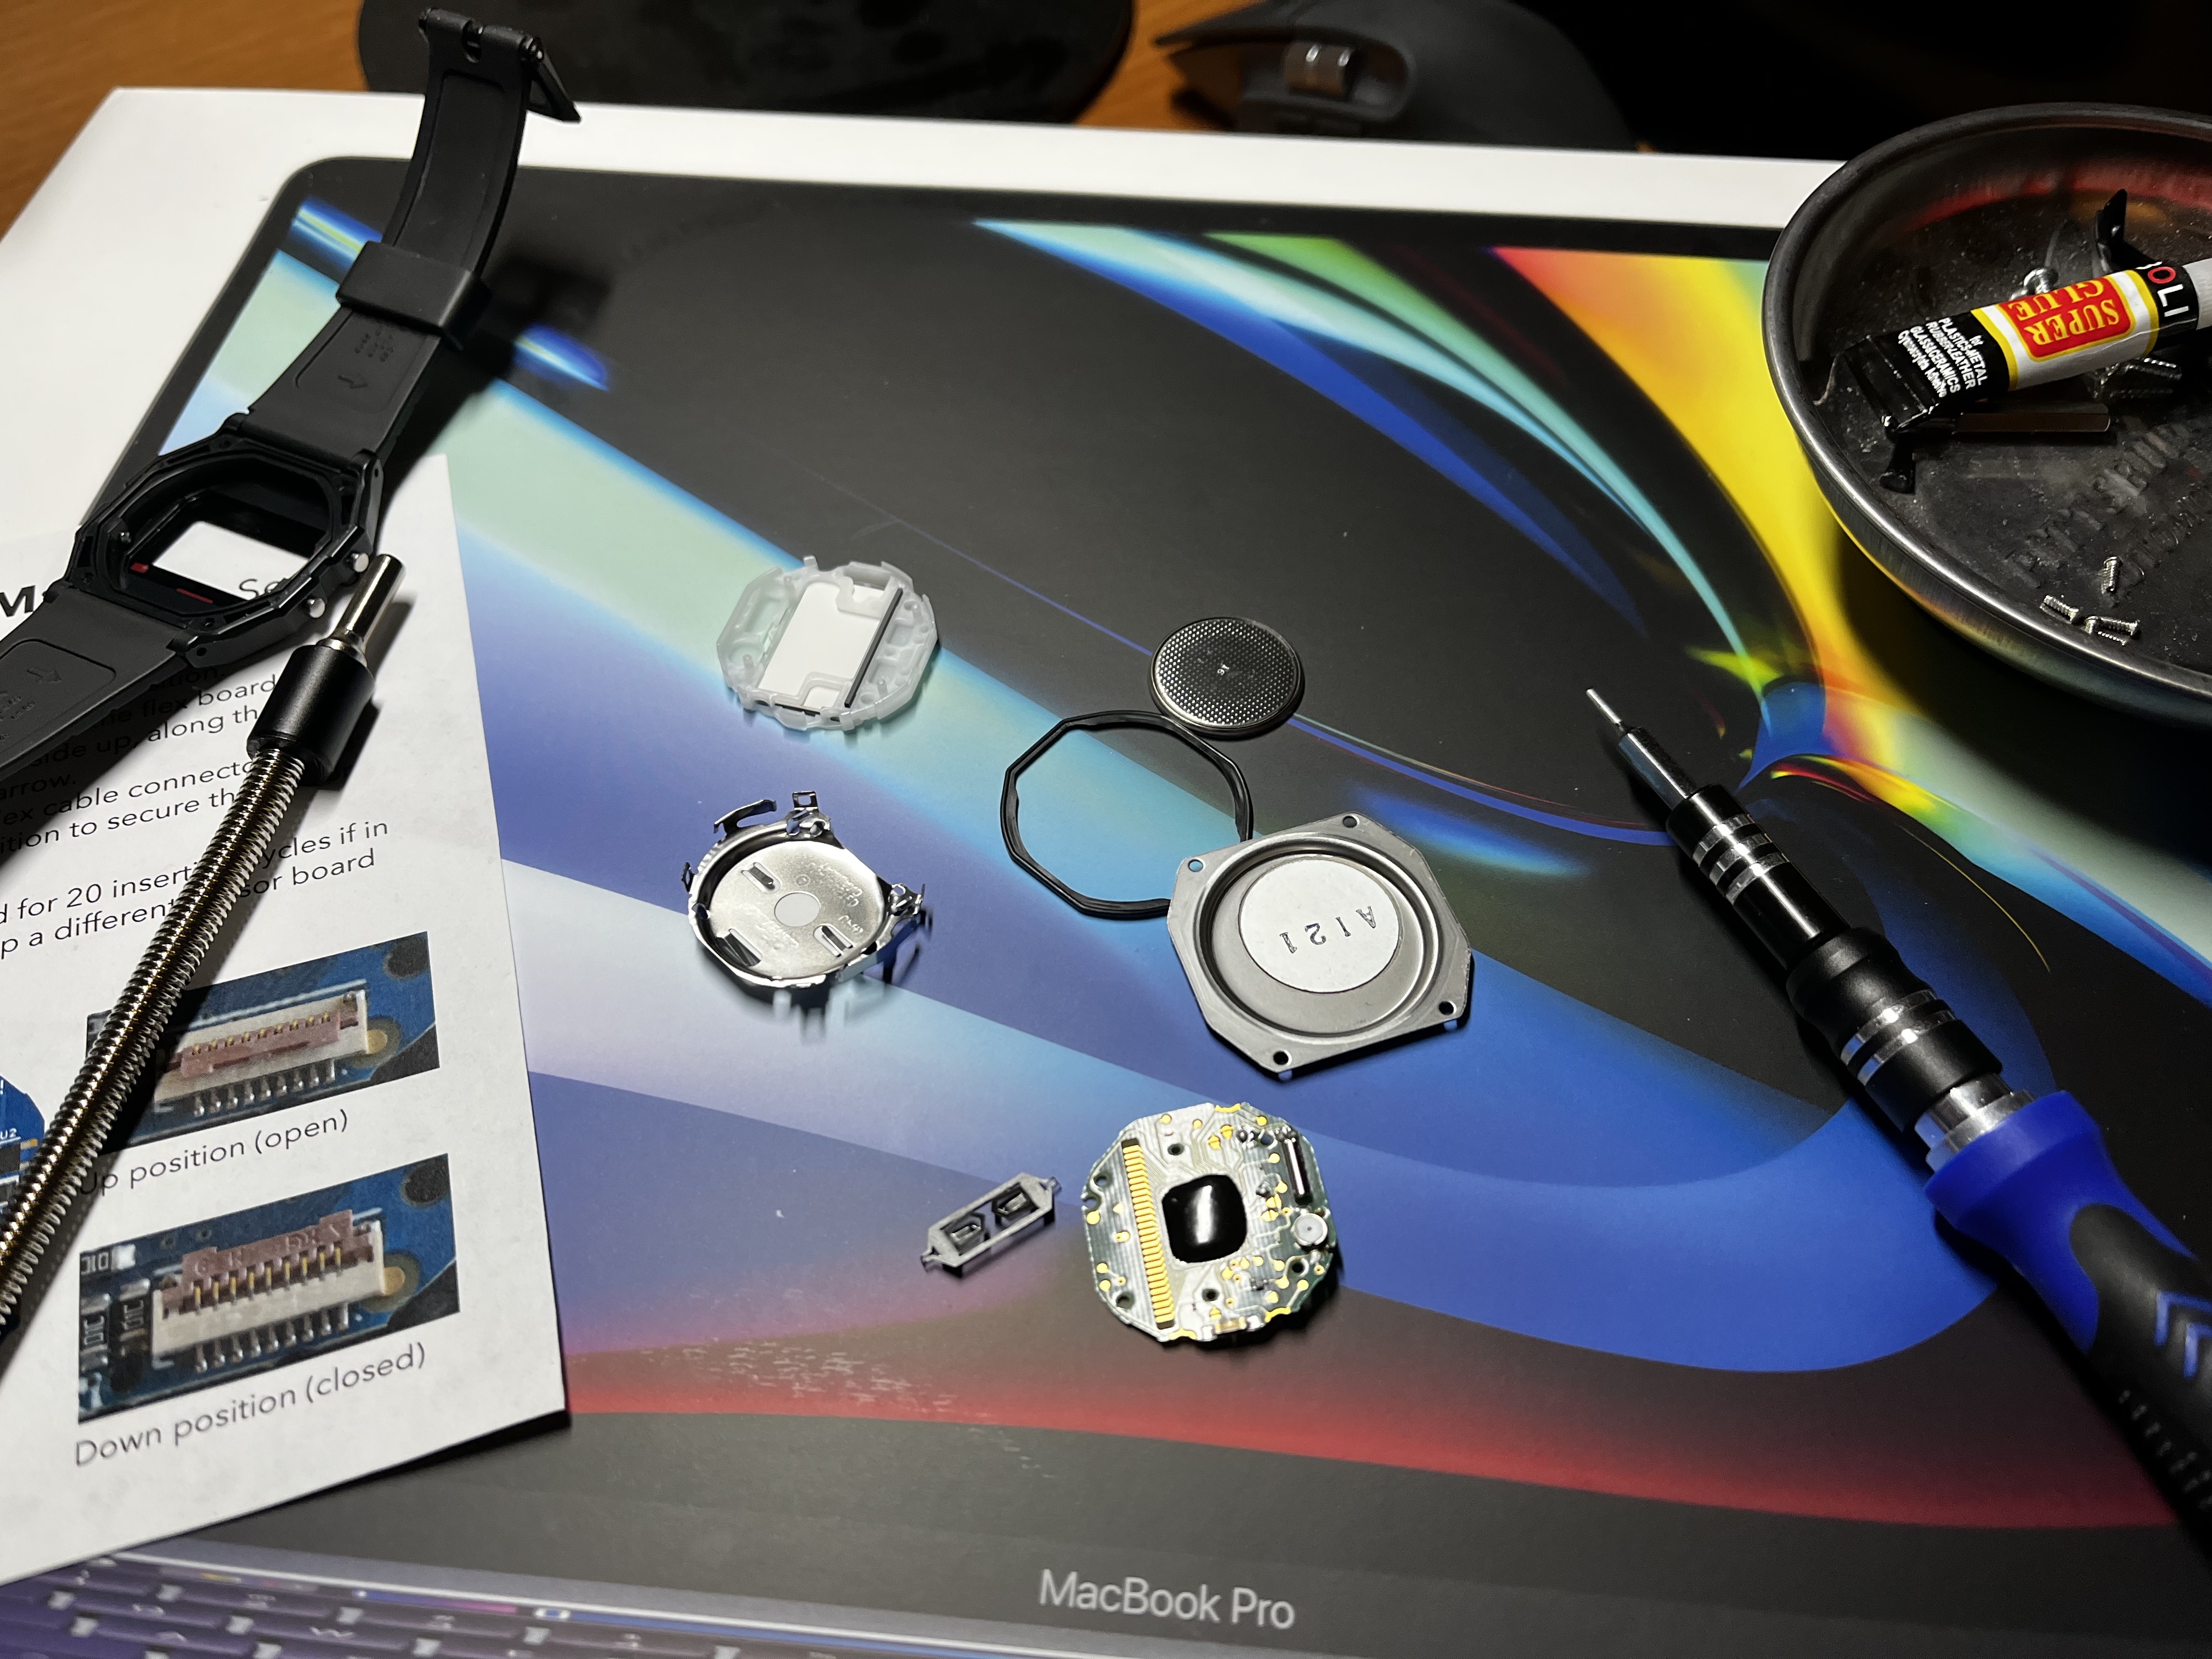
Next, I swapped out the green circuit board for my fancy new limited early backer edition blue sensor watch circuit board. Part of this process was attaching the flexible orange temperature sensor in order to be able to read the ambient temperature!
After that, I put it all back together to test that everything worked with the base firmware. It worked great! My favorite parts of the upgraded watch are being able to tell the temperature, quickly get sunrise & sunset times, and see the current moon phase. I also think being able to read the coin cell battery voltage is a neat capability that consumer electronics tend to hide away from the end user.
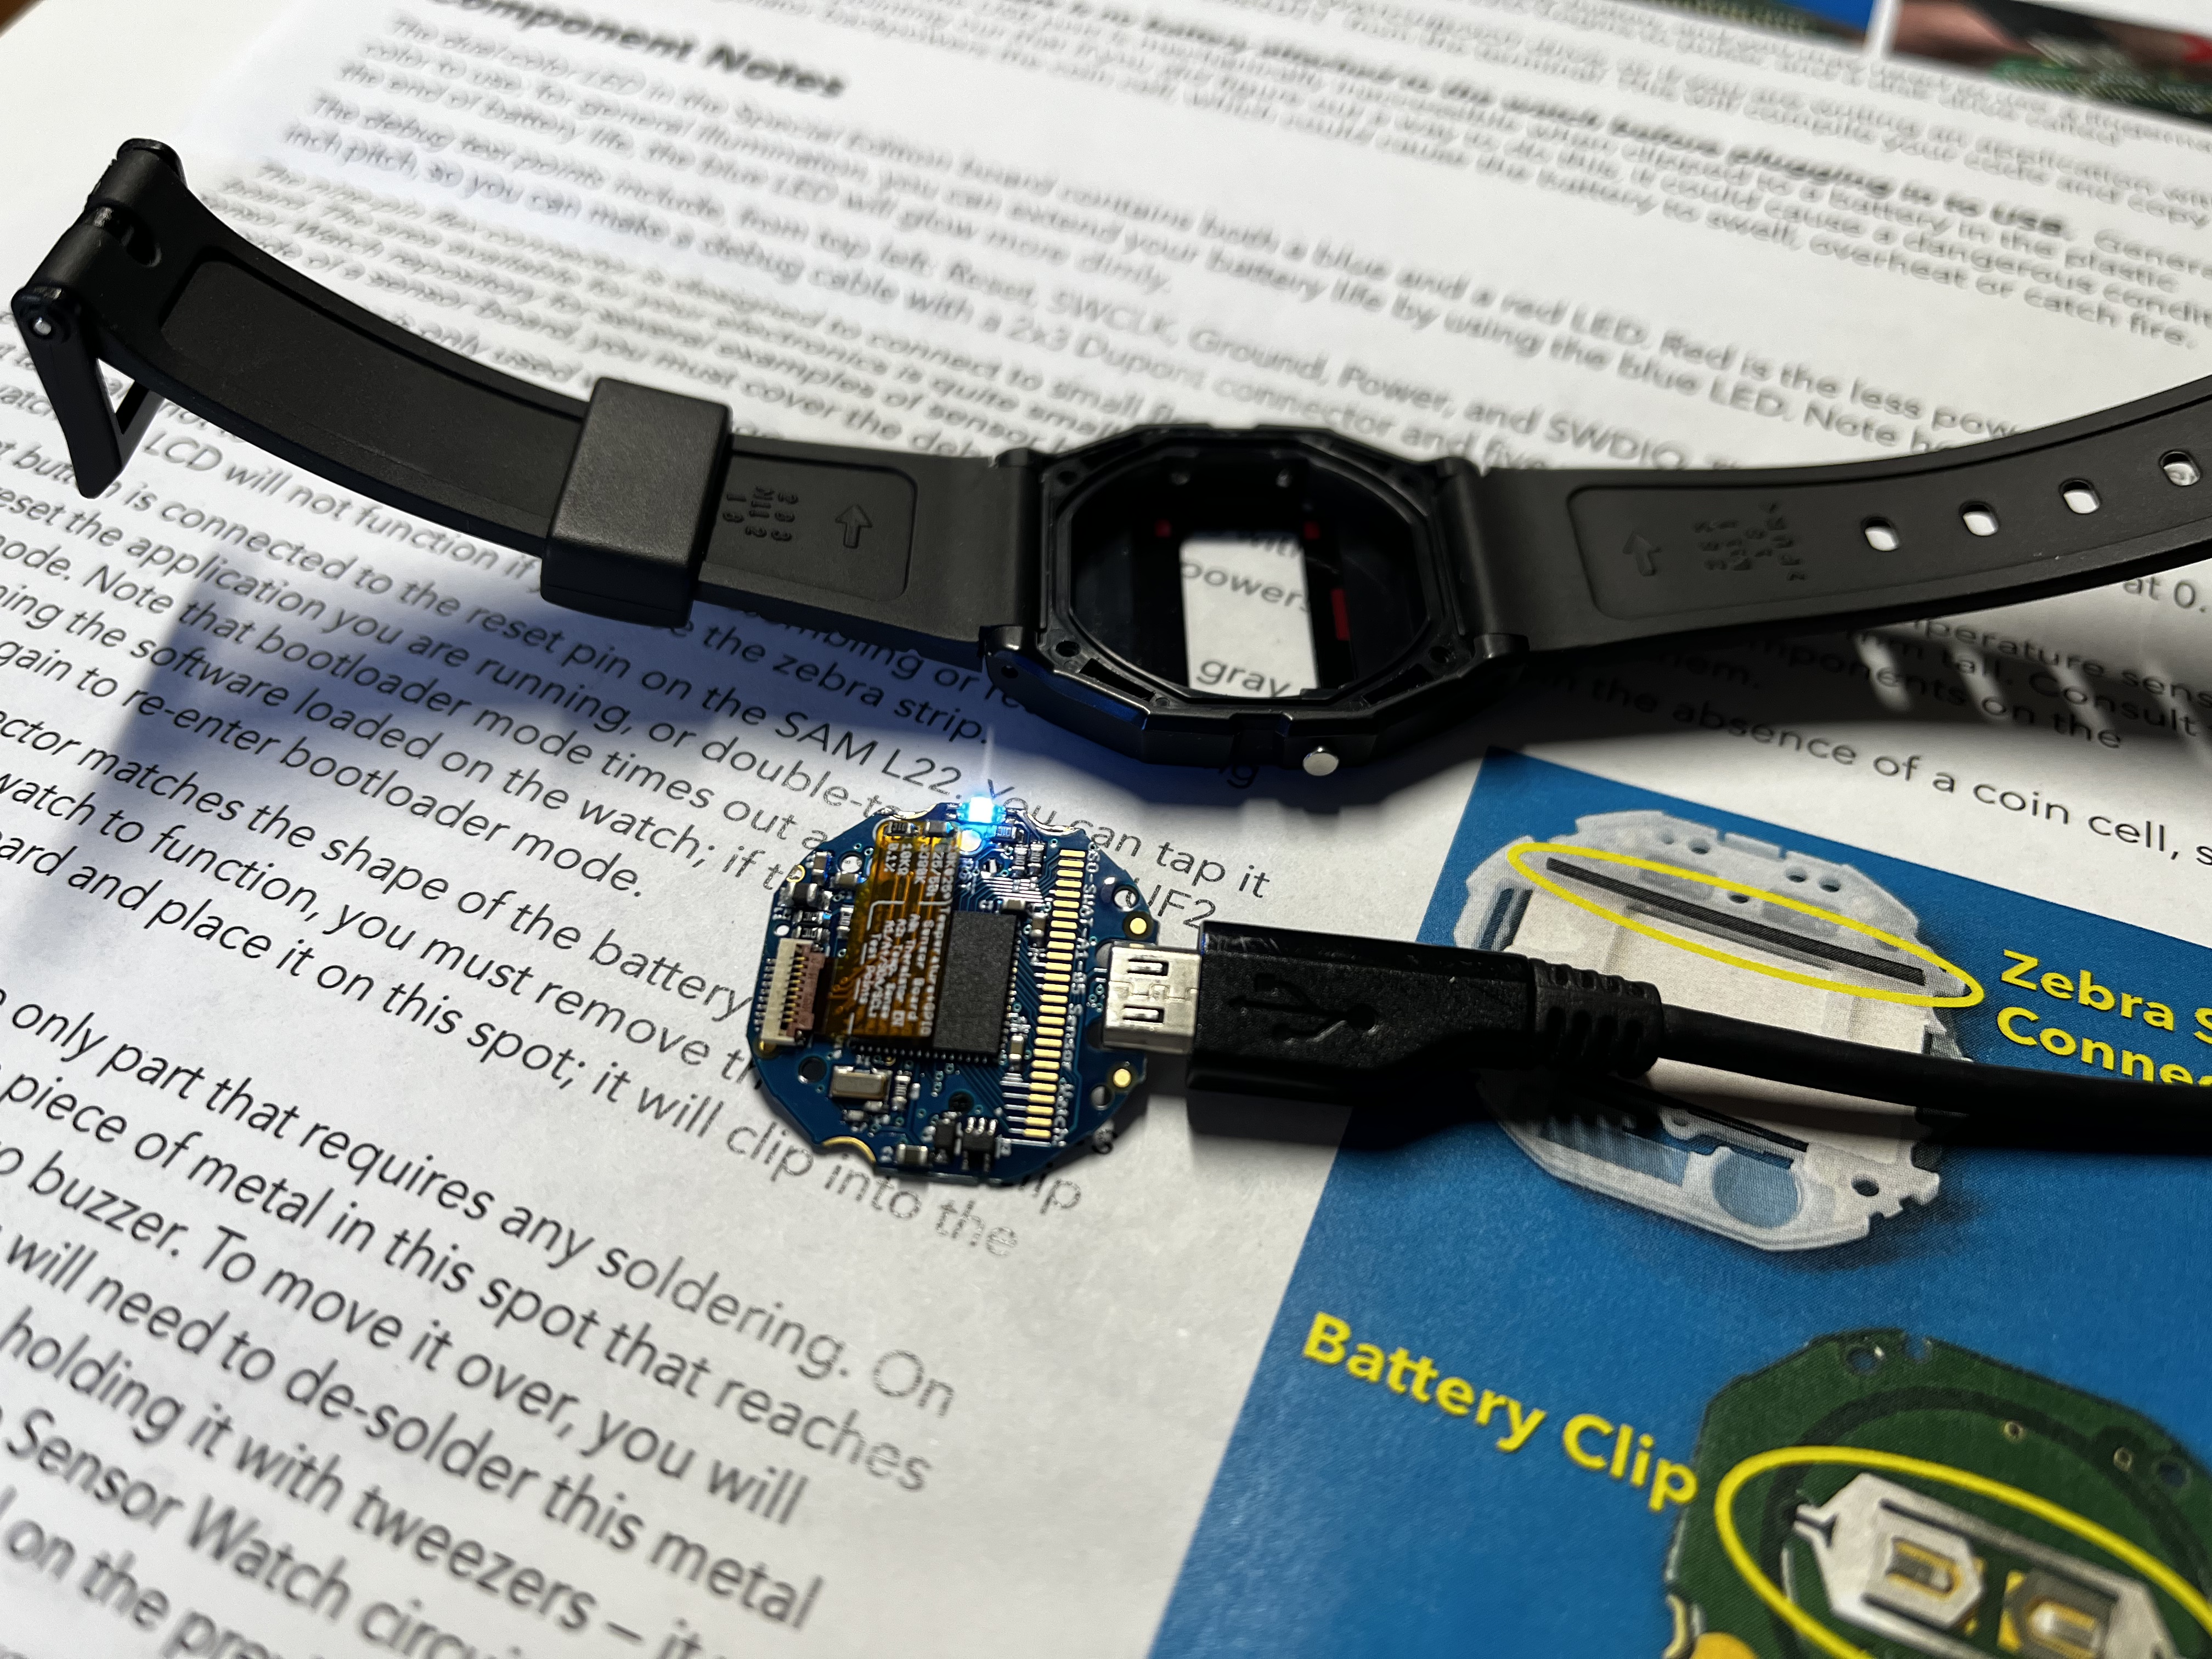
The only task remaining was to upload my new probability watch face! The PCB uses a clever technique to make a small portion of the board act as a Micro-USB port. Adding the new firmware was as simple as plugging the board into my computer, pressing a tiny (it's so small) reset switch, and dragging my firmware file directly onto the watch.
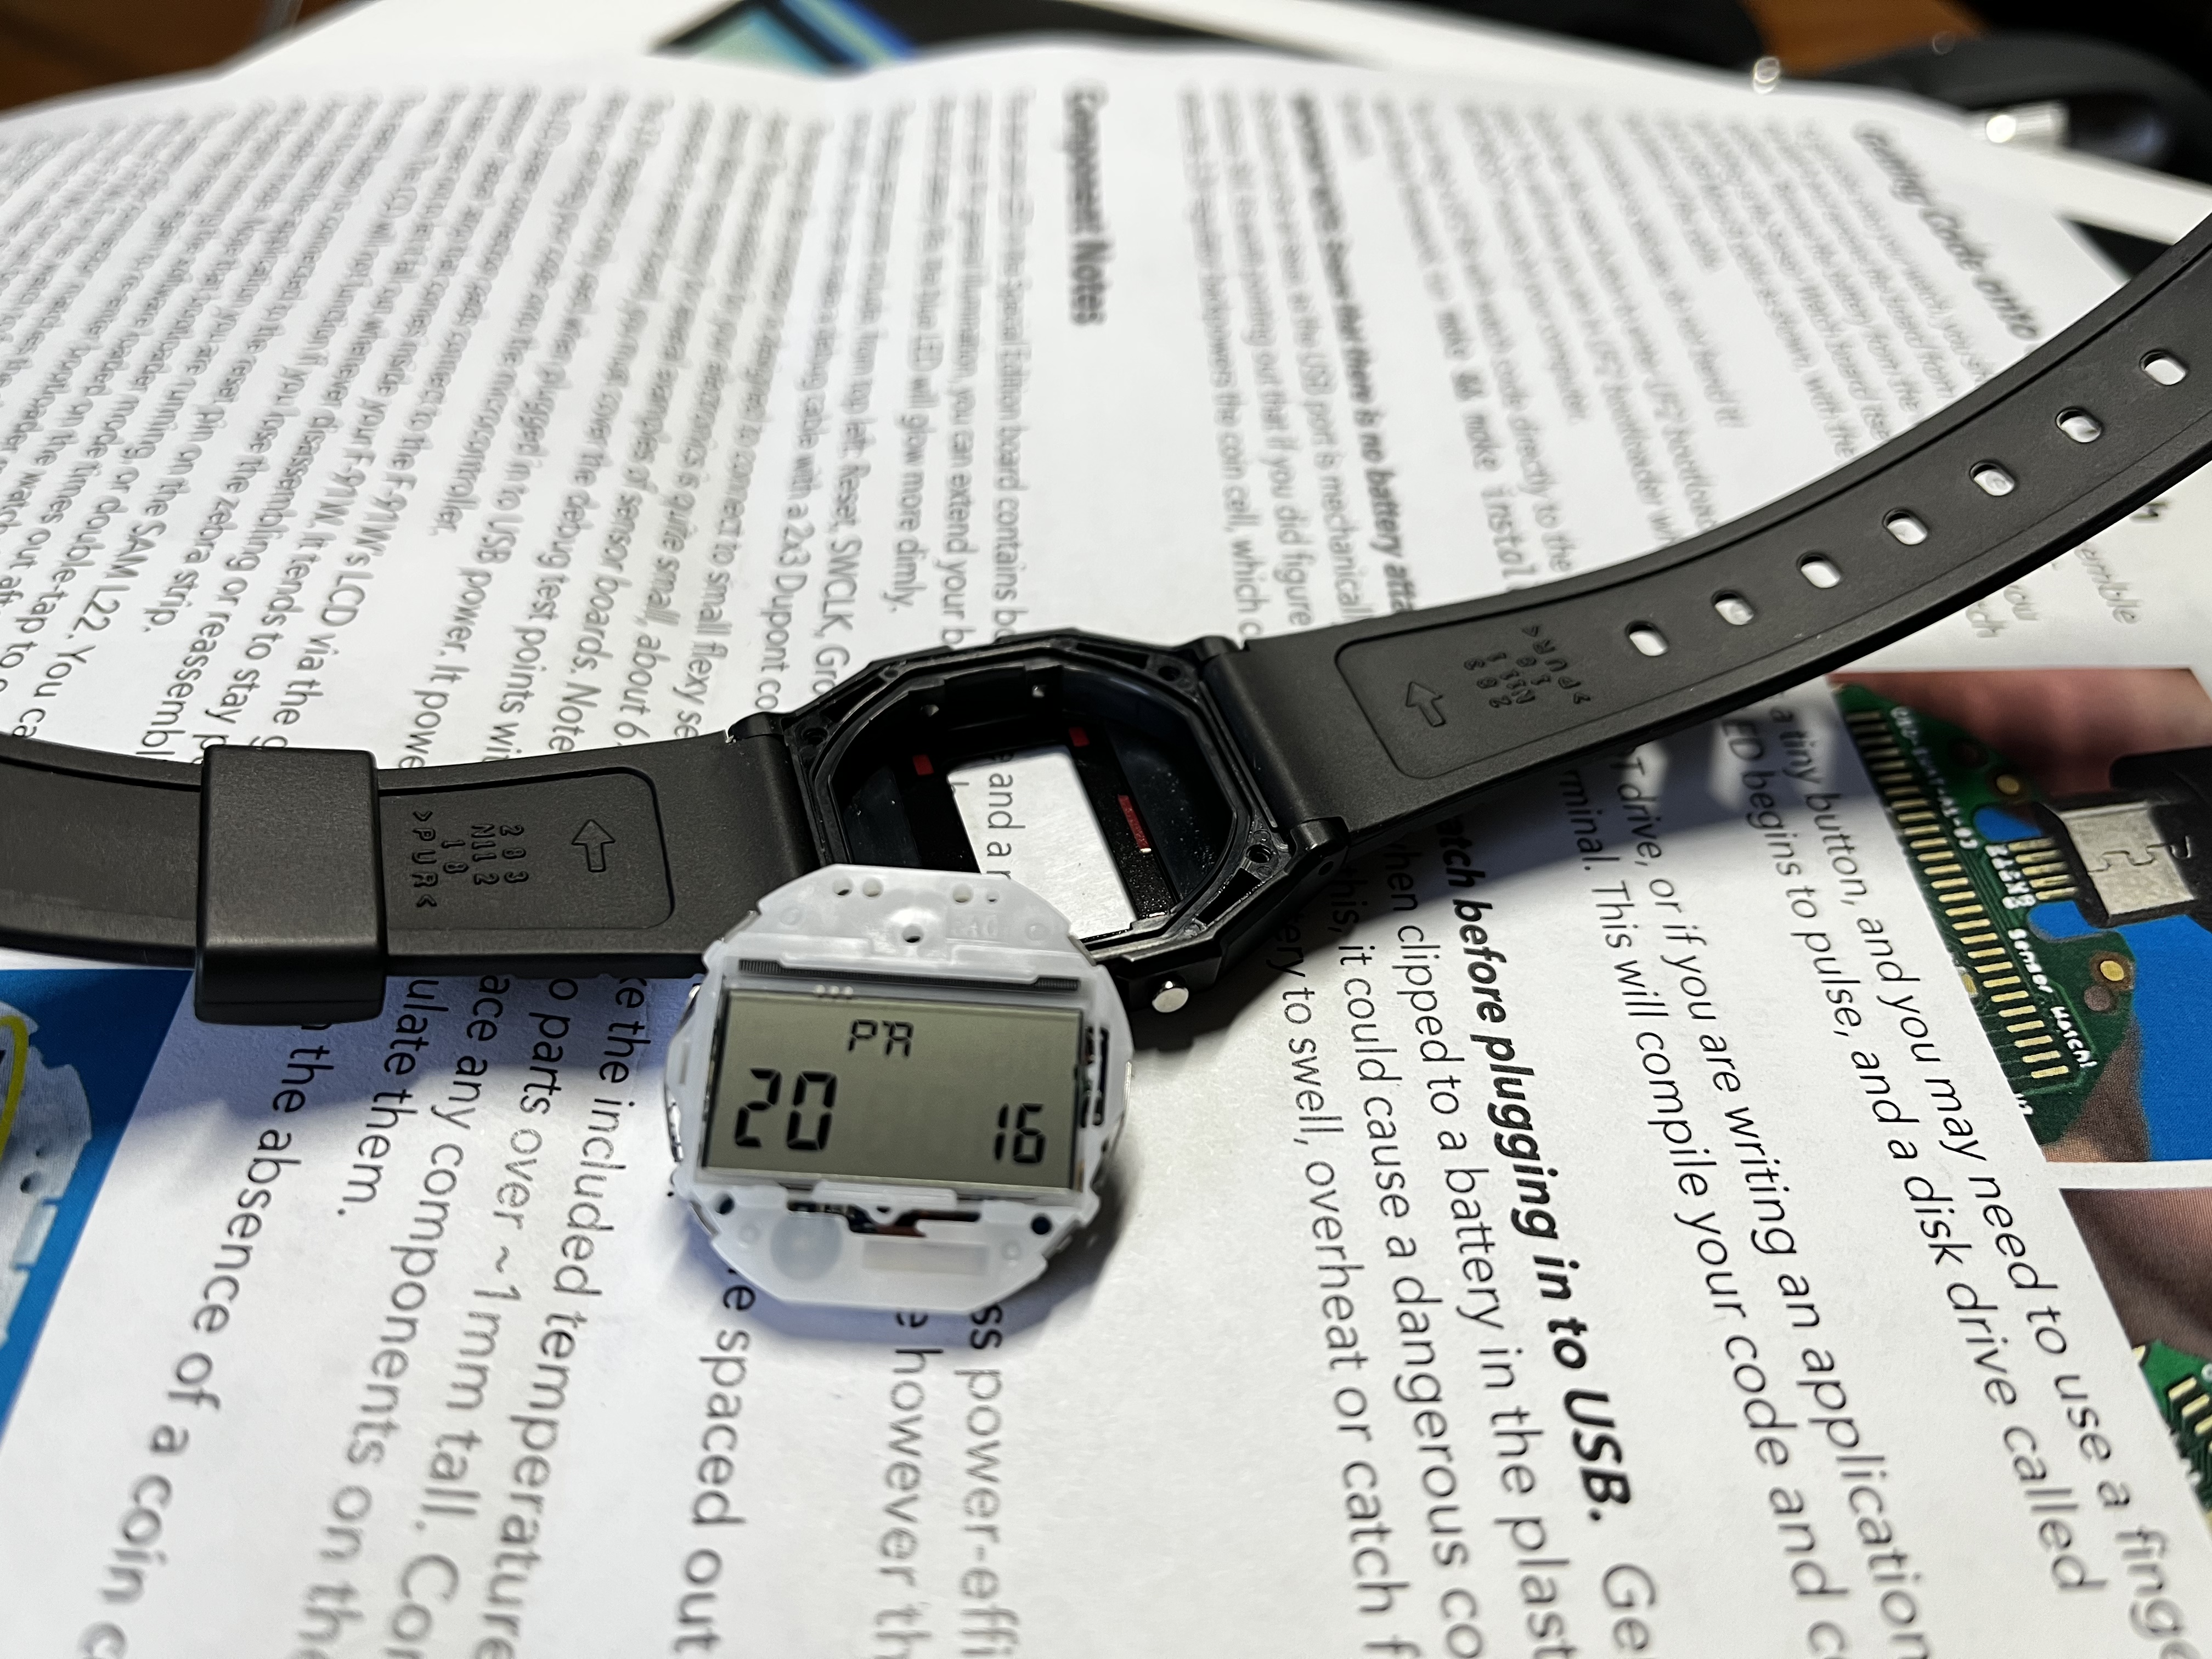
Finally, it was time to see if my code would run properly on actual hardware! I did a partial reassembly and tried out my first dice rolls, and it worked perfectly:
You can see a more in-depth video demo I did here, if you'd like.
Conclusion
Hopefully my enthusiasm for this projects bleeds through. I've really enjoyed following this project from its inception and I'm really glad I was able to build my own!
Although it was fun simply replacing the circuit board and getting some brand new functionality on my watch, nothing beats the feeling of writing code and getting to run it on physical hardware. Having something tangible that you can poke at and say "hey, I made that" is just so empowering. I hope my small projects inspire you to do something you've had on the back of your mind!
Thanks for reading!